

What to Expect During a Home Extension Project
A home extension is an exciting way to add space and value to your property, but knowing what to expect can help you prepare for the journey ahead.
Deciding If and How to Extend Your Home
Before diving into plans and blueprints, take a moment to really look at the way your home works for you now. Consider your daily routines: Are you constantly tripping over shoes in a cramped hallway? Dreaming of a bigger kitchen to host friends? Or maybe you need a quiet nook to finally tackle that stack of novels—or, let's be honest, your growing work-from-home schedule.
Start by reviewing your current floor plan. Sometimes the solution might be as simple as removing a wall or reconfiguring existing rooms to maximise your space, rather than automatically opting for a big extension. For instance, knocking through a seldom-used dining room to open up the kitchen could transform your living area without tacking more square footage onto your home.
If it turns out an extension is the answer, think carefully about where the new space will make the most difference. Here are a few options to consider:
Rear Extensions: Popular for enlarging kitchens or creating open-plan living areas, especially in period terraces and semi-detached homes.
Side Returns: These make great use of narrow paths alongside houses, particularly handy in Victorian and Edwardian properties.
Wraparound Extensions: Combine rear and side expansions for the ultimate transformation—just keep an eye on the garden you’re giving up!
Loft Conversions: Going up can be a smart move if you’d rather not sacrifice green space. Attic bedrooms and home offices are classic choices.
Basement or Garage Conversions: If you have unused space below ground or in the garage, converting could be the perfect way to add an extra room without altering your property’s footprint.
Every home is different, and what works for a friend’s Edwardian terrace might not suit your 1980s bungalow. If you’re not sure which route matches your needs—or if an extension is the right call at all—a chat with an architect can help clarify your options and spark ideas you might not have thought of on your own.
Types of House Extensions
When it comes to extending your home, there’s no one-size-fits-all approach. The possibilities are as varied as your needs and the quirks of your property. Here’s a quick guide to the most popular extension types to consider:
Single-Storey Rear Extension: The crowd favourite. Often chosen for its minimal disruption to the main house, this option lets you expand your kitchen, add that sun-drenched dining area, or finally create the open-plan living space you’ve been dreaming of.
Side Return Extension: Ideal for Victorian terraces and period homes, a side return makes clever use of that typically unused sliver of land at the side of the house—perfect for squeezing more room into a narrow footprint.
Double-Storey Extension: If you have the space (and the appetite for more substantial change), building upwards offers double the gain—think bigger downstairs living and extra bedrooms or bathrooms above. It’s a smart way to maximise both space and value.
Wraparound Extension: For those wanting it all, a wraparound combines rear and side returns, creating a natural flow and oodles of space—excellent for larger families or entertainers at heart.
Loft or Attic Conversion: Not keen on losing garden space? Look skywards. Converting your loft can add an extra bedroom, office, or even a bathroom, making the most of what you already have.
Basement Extension: Particularly handy in urban locations where land is scarce, going underground can unlock a hidden level—great for home cinemas, gyms, or just drying your laundry in secret.
Porch Extension: Sometimes, all you need is a little extra buffer from the outside world. A porch can boost curb appeal and create a handy space for coats, boots, and muddy paws.
Garage Conversion or Over-Garage Extension: If your garage is more spider sanctuary than car storage, converting it—or building above it—can offer valuable extra room without altering your home’s footprint.
Bungalow-to-Two-Storey Conversion: For bungalow owners craving more than ground-level living, building up is often the solution—transforming your single-storey into a spacious two-floor home.
With so many options available, the right choice boils down to your goals, budget, and how you dream of using the new space.

1. Planning & Design Stage
The process begins with consultation and design, ensuring your extension meets your needs and complies with planning regulations.
Choosing the Right Location and Size for Your Extension
Deciding where and how large your extension should be depends on several key factors—your property’s current layout, available outdoor space, planning restrictions, and your budget. Many homeowners gravitate towards single-storey rear extensions, as these typically blend well with the existing structure and open up the interiors without dramatically altering the front of the home.
However, your options aren’t limited to the back of the house. Depending on your plot, you might consider extending to the side (a popular choice for terraced or semi-detached properties) or even the front, if space and planning regulations allow. If you’re looking to significantly increase your living area and your budget allows, a double-storey addition or a loft conversion could deliver the extra space you need while maximizing property value.
Ultimately, it’s best to assess your needs against what your property can support, consulting with designers or architects to explore all layout possibilities. This way, you can strike a balance between your vision, your budget, and the practicalities of planning approval, ensuring your extension meets your needs and complies with planning regulations.
Creating Your Extension Wish List
Before any sketches hit the paper, take some time to consider how your home currently works for you—and, more importantly, how it doesn’t. Reflect on what sends you reaching for more storage, dreaming of open-plan living, or wishing for an extra loo when guests descend. Jot these ideas down; they’re the foundation of your extension wish list.
Start by walking through each room, noting frustrations and what you’d change if you could wave a magic wand. Perhaps it's a brighter kitchen, a bigger utility area, or just more breathing space in the hallway. Once you have your “must-haves” and “nice-to-haves,” rank them to clarify what matters most.
When it comes to reimagining your layout, don’t be afraid to get creative. Try drawing a rough floorplan, ignoring for a moment the current arrangement of walls and doors. Think big: If you could redesign anything, what would your ideal space look like? Online tools like Roomstyler or even good old-fashioned graph paper can help you visualise possibilities. This step is all about dreaming, not limiting yourself by what’s already there.
With your wish list and some draft layouts in hand, you’re ready to discuss your ideas with a designer or architect. They’ll help you explore what’s possible within your budget and the footprint of your home...
Choosing the Right Professional for Your Extension
Selecting the best professional for your home extension is a key step in ensuring your project runs smoothly. While you’re not legally required to hire an architect, investing in the right expertise from the outset can make a substantial difference in the end result.
Understanding Your Options
Depending on your vision and budget, you can consider several types of design professionals:
Draughtspeople: Great if you already have a clear idea and just need technical plans prepared for your builder. They’re especially suited for straightforward designs, like a modest kitchen extension or a small utility room.
Architectural Designers: Their qualifications and experience can vary. Some may have formal training or certifications, while others may simply offer practical experience with extensions similar to yours.
Architectural Technologists: These professionals balance creativity and technical know-how, producing detailed and innovative plans. Look for those registered with the Chartered Institute of Architectural Technologists (CIAT) for a recognised standard.
Architects: Fully qualified architects bring a holistic approach, considering your home’s overall flow and future needs. In the UK, “architect” is a protected title, so you’ll know you’re working with someone who’s undergone extensive training and is registered with the Architects Registration Board (ARB).
What to Look For
Before appointing a professional, do a little homework:
Review their previous work and ensure they have experience with projects similar in size and style to your own.
Ask about their process—do they offer full project management, or will you need to coordinate with other consultants, such as structural engineers?
Make sure you understand the scope of their service and what’s included at each fee level.
Flexible Services to Fit Your Needs
If your budget doesn’t stretch to a full architectural service, many professionals now offer consultation packages—a great way to tap into expert advice for an hour or two at a lower cost. These sessions can help fine-tune your ideas and ensure you avoid common pitfalls, setting your extension up for success from the very beginning.
Choosing your designer is about more than just drawings—it’s about finding someone who understands your needs and can deliver a result that complements your home and lifestyle, ensuring your extension meets your needs and complies with planning regulations.
Do You Need an Architect?
You might wonder whether hiring a fully qualified architect is a must for your house extension. The truth is, while an architect can bring creativity and expertise to your project, it’s not actually a legal requirement. Plenty of homeowners choose to work with architectural technologists or experienced designers—many of whom can produce quality plans at a potentially lower cost.
Ultimately, it comes down to your preferences, the complexity of your project, and your budget. If you want something truly bespoke or are dealing with a tricky site, investing in an architect’s services can make a world of difference. For more straightforward extensions, a skilled designer or technician may suffice. The key is to find someone whose skills and approach match what you have in mind, setting the stage for a smooth journey ahead.
Once you've got a vision in mind, the next step is getting those ideas down on paper—professionally. There are several types of experts who can prepare plans for your extension, depending on your ambitions and budget:
Architects: The gold standard of design expertise, architects are trained to approach your project holistically, ensuring not just aesthetics but also practical flow. In the UK, they undergo years of rigorous training and are ARB-registered.
Architectural Technologists: These professionals specialize in both creative design and technical detail. They focus on the nuts and bolts of how a space functions and are particularly adept at producing thorough construction drawings.
Architectural Designers or Draughtspeople: Ideal for straightforward projects or if you already have a solid idea of what you want. They can use CAD tools to produce detailed plans your builder can follow, though qualifications and experience can vary widely.
Design & Build Contractors: Some choose a one-stop-shop with a design and build firm, which handles everything from sketches to construction under one roof. This route can streamline the process, especially if you're after convenience.
DIY Design: Confident in your own skills? There are user-friendly design software options that let you draw up a basic plan. But even with a DIY start, it’s wise to consult a structural engineer and check regulatory requirements.
No matter the route, always check your chosen professional's experience and past work to be sure they'll deliver the look and quality you’re after. For larger or more complex extensions, involving a qualified architect or technologist usually pays dividends in both finish and functionality.
Who Can Design Your House Extension?
When it comes to the actual design of your house extension, you have several routes to choose from. Your decision will depend on the complexity of your project, your budget, and how involved you want to be in the process.
Architects: Highly trained and registered professionals, architects are well-versed in both creative design and technical requirements. They bring a holistic approach, making sure your new space blends seamlessly with your existing home and meets all regulations. Architects can project-manage the whole design process, though their full service often comes at a premium.
Architectural Technologists: These specialists focus on the science and technology behind building design. An architectural technologist can offer innovative layouts and produce all the technical drawings needed for both planning and construction phases. Their expertise is ideal if you want creative input paired with practical know-how.
Design & Build Companies: Some firms (Creating Spaces) offer a combined design and construction service, handling everything under one roof. This can streamline communication and the overall process, especially for homeowners who prefer a single point of contact.
Draughts People / Architectural Designers: For straightforward projects or when you already have a clear vision, a draughtsperson or designer can create technical plans that a builder can follow. Experience and qualifications vary in this group, so it’s important to research their portfolio and credentials before proceeding.
DIY Design: If your extension is small and you’re comfortable using design software, creating your own plans is an option. However, bear in mind that you may still need professional input from a structural engineer or to ensure your design meets local building standards.
No matter which route you choose, it’s wise to research examples of previous work and confirm your designer’s experience matches the scale and style of your desired extension. For large or ambitious projects, consulting with a qualified professional at an early stage can save time (and headaches) later on.
Selecting the right designer sets the tone for your entire project—so investing time in choosing someone who understands your vision is always worth it. ensuring your extension meets your needs and complies with planning regulations.
Understanding Building Regulations
Before any work kicks off, it’s important to remember that every home extension, regardless of whether you need planning permission, must comply with Building Regulations. These are essential standards set by the government to ensure that your extension is safe, structurally sound, energy-efficient, and fit for habitation.
You’ll need to notify your local building control team about your plans, either by submitting detailed architectural drawings—ideal if your extension is on the larger or more complex side—or by using a simpler building notice for more straightforward projects. Throughout the build, inspectors will visit at key milestones (think: foundations, electrics, and final completion) to sign off on the work and make sure everything meets the latest requirements.
Staying on top of these regulations might not be the most glamorous part of extending your home, but it’s crucial for protecting your investment and keeping your household safe.
Working with Designers and Architects
Choosing the right designer or architect can make all the difference in your extension project. Some professionals take a hands-on approach, guiding you beyond the initial drawings. They often have trusted relationships with contractors and will help connect you with builders whose experience fits your project. Rather than leaving you to sift through a stack of quotes, they may introduce you to a carefully matched contractor and even help negotiate terms, so you're not left in the dark over pricing or process.
You may also encounter designers or architects who remain actively involved throughout your project. Services might include contract administration—essentially overseeing the builder’s work to ensure your extension sticks to the agreed plans and meets quality standards. Some may regularly visit the site or provide advice at key stages, including the important "snagging" phase, where they help spot and resolve any issues before you move into your new space.
Of course, some professionals offer a more streamlined service, delivering high-quality technical plans and then stepping back, leaving you to manage construction. In those cases, you'll need to thoroughly research and appoint a reputable builder yourself.
Ultimately, it’s important to clarify what’s included in the package before you sign on the dotted line. Some designers will be your project partner from start to finish, while others provide the vital blueprints for your dream extension—so be sure you know exactly what support you’re getting.
Finding a Reliable Builder or Contractor
Selecting the right builder can make all the difference when embarking on your home extension. Start by asking your designer or architect if they have a shortlist of trusted contractors they’ve worked with before—many professionals have built up strong networks and can recommend someone suited to your specific project and location.
If you’re sourcing builders independently, a little detective work can go a long way. Check online business directories and Companies House to ensure the builder’s firm is financially stable. Asking neighbors for recommendations can also be invaluable— builders with experience in your area will already know the quirks of local properties and planning nuances.
To compare quotes fairly, provide each contractor with complete architectural drawings or plans. This helps ensure each builder is quoting on the same basis, making your comparisons much more meaningful. Remember, the lowest quote isn’t always the best deal—quality and reliability are just as important as price.
Before hiring, look for:
Evidence of professional memberships, such as the Federation of Master Builders (FMB), indicating the contractor meets industry standards.
Willingness to put you in touch with past clients or arrange site visits to previous projects, so you can see their work first-hand.
Clear communication from the start. A good builder will answer your questions promptly and keep you updated throughout.
Avoid the temptation to project manage everything yourself unless you have plenty of experience. Relying on a reputable main contractor to coordinate trades will save you headaches down the line.
Finally, always agree to a contract with staged payments, ideally with no more than a 10% deposit upfront. This protects both you and the builder as work progresses.
How a Professional Design Service Adds Value
Bringing a professional design service into your home extension project can be a game-changer—think of it like having a satnav for your renovation journey. Whether you work with an architectural technologist or a fully qualified architect, their expertise goes far beyond drawing up plans. They'll listen to your ideas, find creative solutions you may never have considered, and translate your wish list into detailed, accurate drawings that make life much easier for your builder when the hammers finally come out.
So, what’s the real benefit? For starters, professionals help ensure your extension meshes seamlessly with your existing home, often proposing layouts or tweaks that maximise space and light. It’s not just about making the new bit look nice—it’s about ensuring the whole house works better together.
If you're working to a tight budget, don't worry. Many architects and designers now offer consultancy sessions, so you can get expert advice without committing to a full design package. These one-off meetings can be invaluable, giving you clarity on your ideas, practical tips tailored to your home, and reassurance before you make any big decisions.
Ultimately, investing in design support can not only boost your home’s value and functionality but also smooth out the bumps in the process—saving you time, stress, and potentially expensive mistakes down the line.
Why Detailed Plans Matter for Extension Quotes
One of the biggest steps you can take to ensure a smooth home extension project is providing your prospective builders with comprehensive architectural drawings or clear plans from a quantity surveyor. But why does this matter so much when collecting quotes?
Put simply, detailed plans make it possible to compare quotes accurately—it's the difference between comparing apples to apples and apples to oranges. When every contractor is working from the same set of drawings, you can be confident that each quote covers the same scope, specifications, and materials. This clarity minimizes the risk of surprises later on, whether that's unexpected costs, miscommunications, or discovering that something essential has been left out.
Additionally, clear plans:
Help prevent misunderstanding and confusion between you and your builder.
Allow each contractor to price the project fairly and thoroughly.
Reduce the chances of costly changes or delays down the line.
Without detailed plans, quotes can vary wildly, and what seems like a bargain can quickly become expensive if important elements are overlooked. So, before you start the quoting process, take the time to have precise drawings and specifications prepared. Your future self—and your budget—will thank you.
Working with Design Professionals to Source and Manage Contractors
Bringing a design professional or architect on board can simplify the process of finding and working with contractors for your home extension. Many designers have established networks of skilled builders that they trust, which can save you the headache of starting your search from scratch. Instead of casting a wide net, your designer may introduce you directly to builders who are well-suited to your specific project, helping to ensure a good fit in both skills and approach.
Beyond making introductions, some design professionals go a step further by acting as your advocate during price negotiations, aiming to secure the right deal for your build. You may also find that certain architects offer contract administration services, meaning they’ll oversee the entire construction phase. This includes monitoring build quality, ensuring adherence to the original design, and managing any changes or challenges that arise along the way.
If you prefer a lighter touch, some designers are happy to provide guidance as needed—reviewing progress now and then or helping with final snagging checks once the dust settles. It’s important to clarify what’s included upfront, as service levels can vary: some will provide only the necessary technical drawings, while others offer full support from start to finish.
If you choose to handle builder selection yourself, be thorough in your research. For instance, you can check the company’s financial stability using Companies House, review testimonials, and ask for references. Taking these steps gives you greater peace of mind as your extension project moves forward.
Choosing Your Approach: Self-Managed vs. Professional Builds
When it comes to bringing your extension to life, there’s more than one way to tackle the build. The right route depends on your confidence, expertise, and how hands-on you want (or are able) to be throughout the process.
If you’re keen to take the reins, a self-managed build could be your calling. This approach means you handle everything from sourcing tradespeople to managing budgets and timelines. It gives you plenty of control—perfect if you love project management and have the time to dedicate. However, be prepared for challenges; coordinating suppliers, reading technical drawings, and solving on-the-spot problems can be demanding. It’s a route many seasoned DIYers or those with construction experience often choose.
On the other hand, most homeowners opt to bring in professionals. Hiring an architect or architectural designer to plan your extension not only ensures your designs comply with regulations but also helps unlock the full potential of your home’s footprint. From there, you can choose between:
Main Contractor Route: You employ a principal builder who oversees the entire project, coordinates subcontractors, and ensures the rhythm of the build stays on track. This reduces your stress levels considerably and offers clear lines of communication.
Design & Build Companies: Some firms—like local design and build specialists or nationwide brands manage the whole journey, from design sketches to final coat of paint. This “one-stop shop” means less juggling and a smoother ride, especially if your schedule is tight.
Project Manager Option: If you want to steer decisions but leave the day-to-day grind to someone else, hiring a dedicated project manager is ideal. They’ll keep an eagle eye on every stage, troubleshoot any hiccups, and manage the trades so you don’t have to.
Each approach has its own merits. Think about your goals, your willingness to get stuck in, and how much time you can realistically commit. For most, working with experienced professionals offers peace of mind and ensures the extension blends seamlessly with your existing home.
No matter which direction you choose, good planning upfront will set you on a smooth path for the stages that follow.
Who Should Draw Up Your Extension Plans?
When it comes to turning your extension dreams into detailed plans, you have several options. Each professional brings unique strengths—and trade-offs—to the table. Here’s a quick guide to help you pick the best fit for your project and budget.
Architects
Pros:
Highly trained (7+ years!), registered with the ARB, and often members of RIBA.
Known for their holistic approach—think big-picture layouts, design flow, and maximizing light or space.
Ideal for complex designs, listed buildings, or if you want wow-factor results.
Cons:
Premium price tag for their comprehensive service.
Not always necessary for simple or small-scale extensions.
Architectural Technologists
Pros:
Qualified professionals (often through CIAT), blending technical know-how with innovative design.
Great for detailed construction drawings and ensuring your plans are buildable.
Generally a bit more affordable than architects, while still giving high-quality plans.
Cons:
May not offer the same level of conceptual design service or creative vision as architects.
Draughtspeople (or CAD Technicians)
Pros:
Can produce technical drawings at an attractive price, perfect for straightforward extensions.
Good choice if you already know exactly what you want and just need plans for your builder.
Cons:
May not provide full design advice or spot pitfalls.
Typically require you to coordinate input from structural engineers or other specialists.
Design and Build Contractors
Pros:
One-stop-shop approach: design, permissions, and build handled under one roof.
Simplifies project management and communication—fewer parties to juggle.
Cons:
You may not end up with a unique or tailored design (and may have limited say in aesthetics).
Focus is often on efficiency and budget, rather than architectural flair.
DIY Extension Design
Pros:
Incredibly cost-effective—just your own time and effort.
Full control over the design decisions (and bragging rights).
Cons:
Steep learning curve: compliance with building regs, CAD software, and general construction know-how.
Risk of expensive mistakes if your plans need amending later.
You’ll almost certainly still need a structural engineer and may need professional drafts for planning.
The Bottom Line
If your extension is ambitious or you want the confidence of a seasoned professional, an architect or architectural technologist is a safe—and stylish—bet. For more modest needs, a draughtsperson or design and build service may keep both your project and wallet on track. And if you fancy a challenge, DIY is possible, just be prepared for some extra homework!
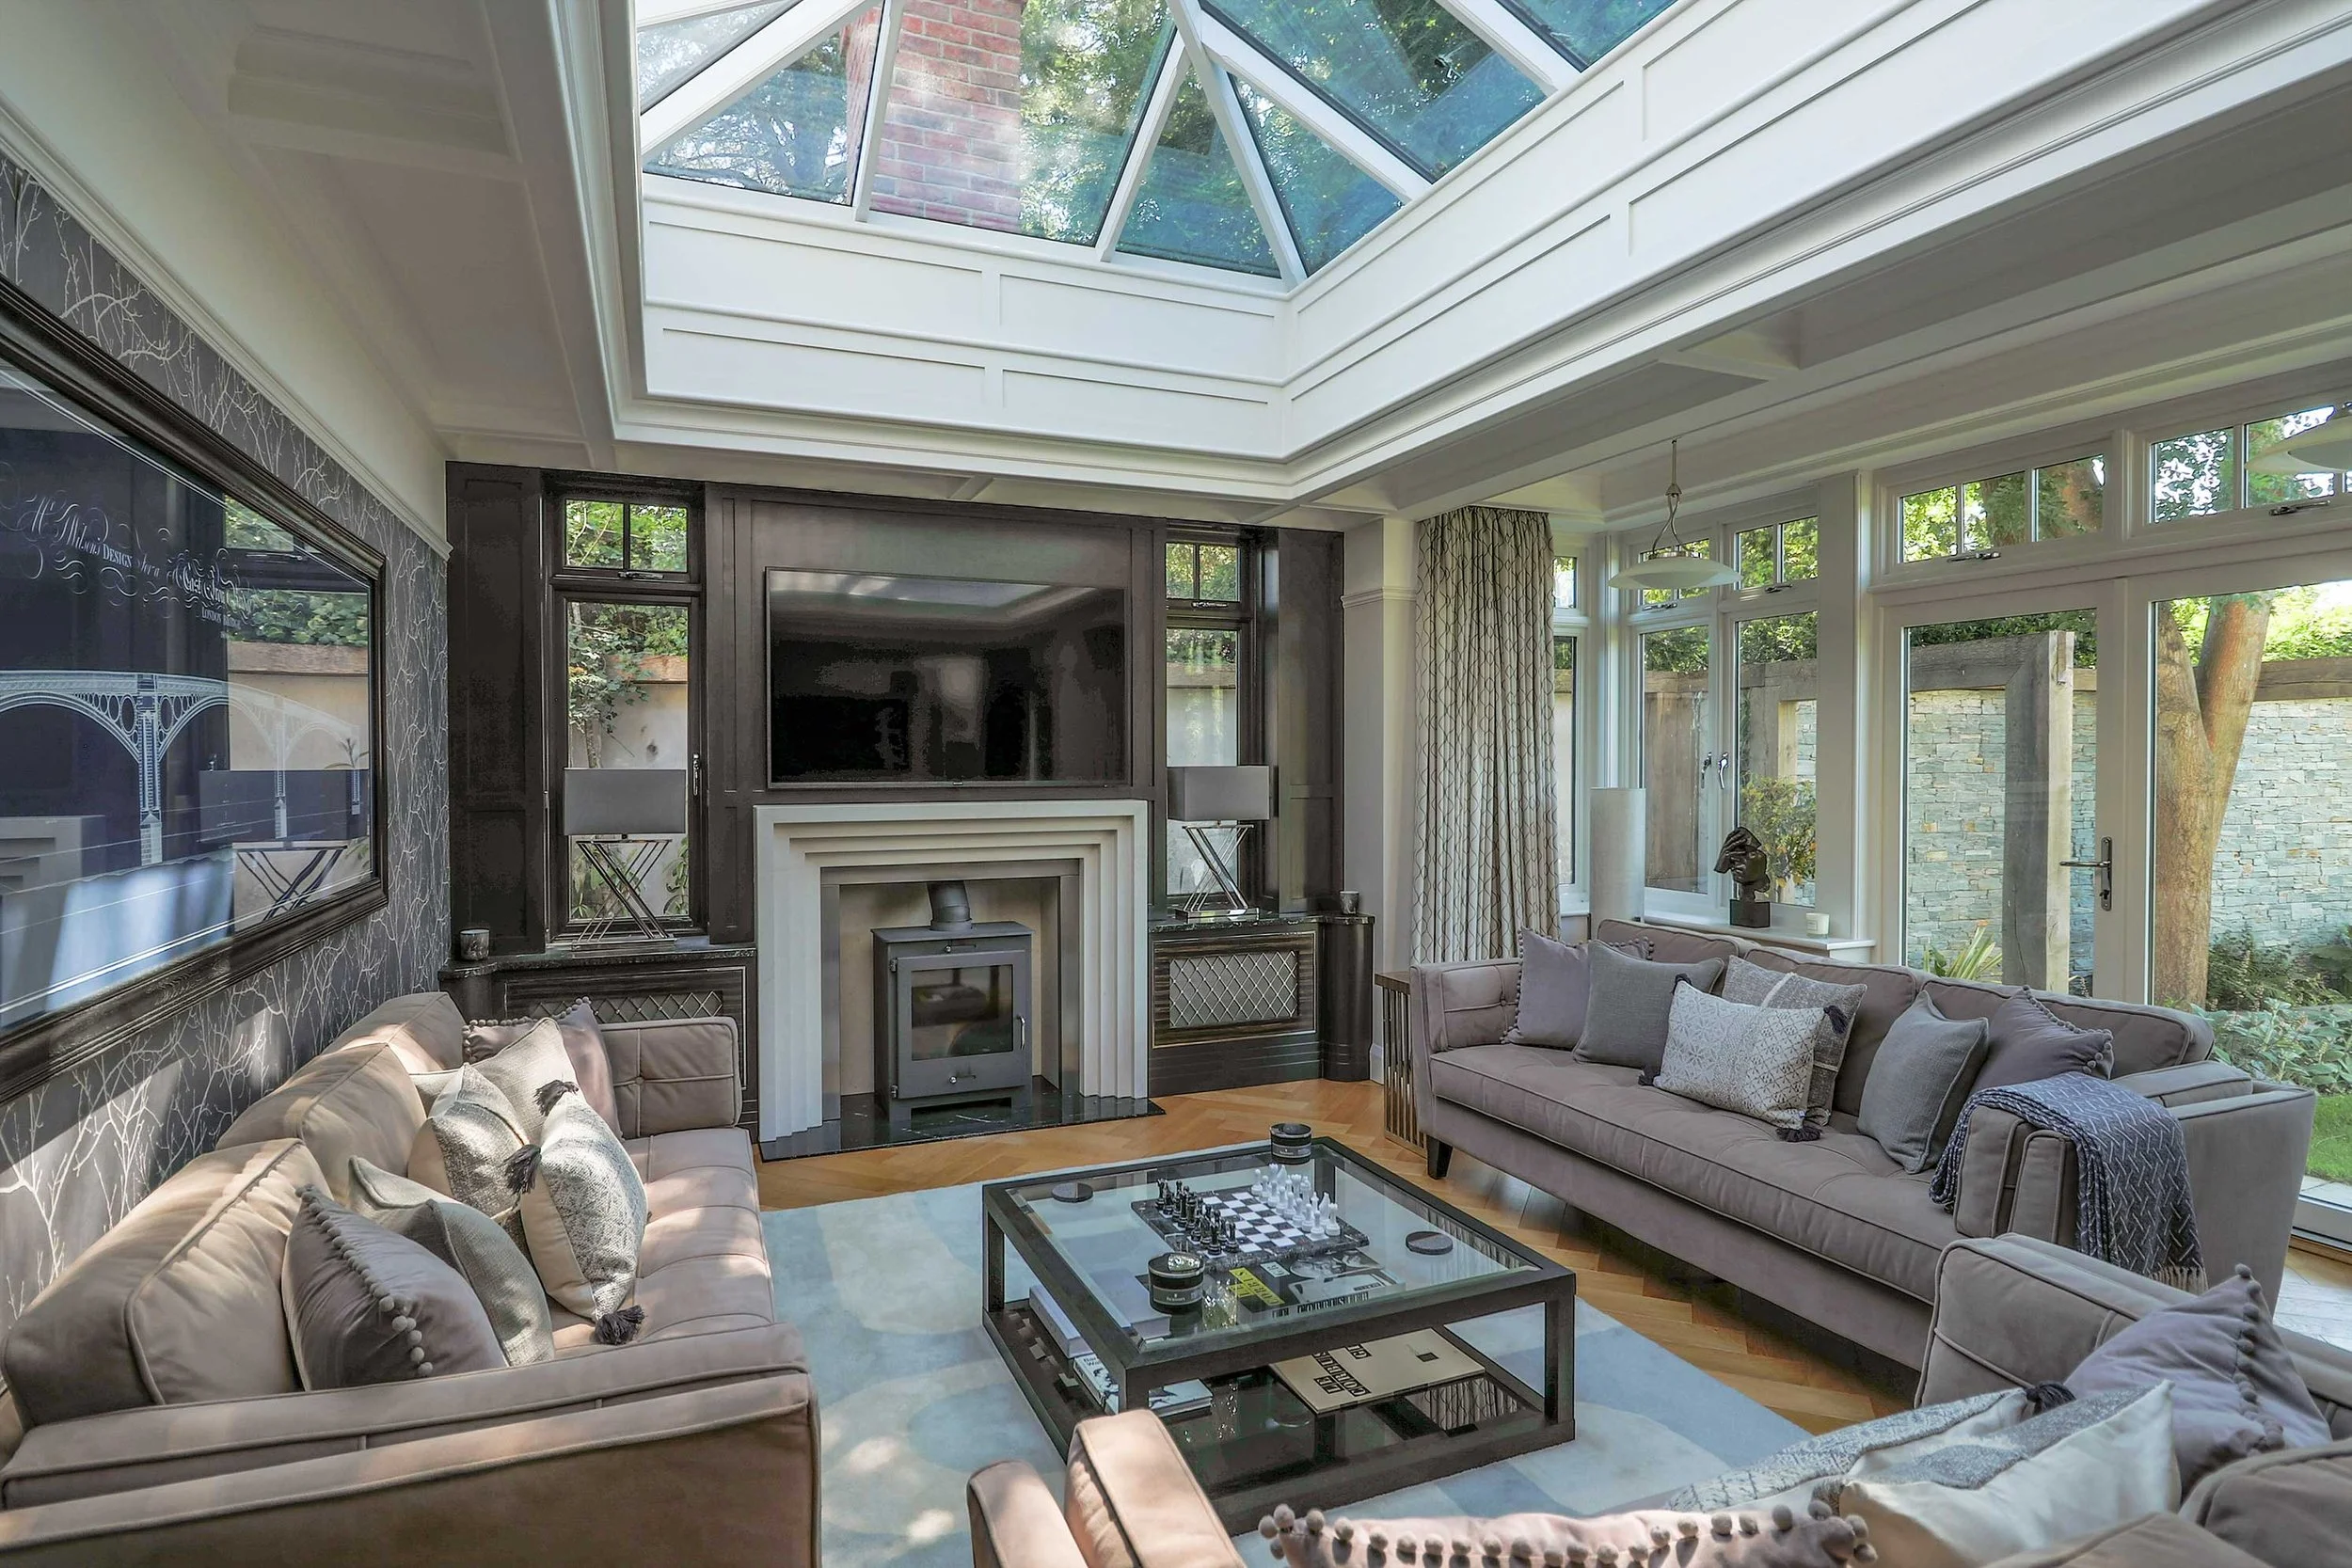
Maximising Natural Light Without Compromising Comfort
We all want bright, airy rooms, but it’s important to strike the right balance between flooding your extension with daylight and keeping those energy bills in check. Here’s how you can welcome the sunshine without sacrificing thermal performance:
Window Proportion Matters
It may be tempting to add wall-to-wall glazing, but more glass isn’t always better. As a rule of thumb, aim for windows and rooflights to make up around a quarter of your floor space. This ratio helps ensure your new space feels bright without turning it into a greenhouse on sunny days or a freezer in winter.Choose Multiple, Modest-Sized Rooflights
Instead of a single, massive rooflight that can let in excessive heat (and let warmth escape in the colder months), consider installing several smaller rooflights. This approach not only spreads light more evenly, but also helps maintain better insulation throughout your extension.Think Carefully About Placement
A well-placed rooflight can beautifully highlight a kitchen island or dining table—but beware of the midday glare! Before committing, imagine where the sun will hit during the day. Strategic placement means you can enjoy natural light exactly where you want it, without having to squint through breakfast.
By keeping these principles in mind, you’ll be able to enjoy a sun-filled extension that’s comfortable all year round.
Expert Tips for Maximising Natural Light in Your Extension
Bringing more daylight into your new extension not only transforms the atmosphere but also improves the overall comfort of your home. Here’s how you can cleverly harness natural light:
Glazing-to-Floor Area Ratio Matters
Simply transplanting windows to a new exterior wall won’t guarantee a bright and airy space. As you expand your floor plan, it’s important to balance the increased area with sufficient glazing—aim for windows or glazed sections to cover about a quarter of your extension’s floor space. This helps prevent your new rooms from feeling gloomy.Choosing the Right Rooflights
The temptation to install one large, dramatic rooflight is understandable, but it’s usually smarter to opt for several smaller ones. Multiple rooflights distribute sunlight more evenly and help control heat gain, keeping your new space comfortable year-round. If you’d like to make a visual splash, consider linking several rooflights together—a look that’s both modern and functional.Strategic Placement Pays Off
Think carefully about where to place your rooflights for both aesthetics and practicality. For example, spotlighting a kitchen island with overhead glazing sounds ideal, but too much direct sun can cause glare and make meal prep tricky on bright days. Try to position rooflights to flood living spaces with daylight, while avoiding direct beams over work areas.
By fine-tuning these elements during the planning and design phase, you’ll create an extension that feels light, open, and beautifully in tune with your daily life.
Who Designs My Extension?
When it comes to creating the plans for your home extension, you’ll come across a range of professionals calling themselves architectural designers, architects, or architectural technologists. The difference often comes down to their training:
Architectural designers can have varied backgrounds. Some are architects-in-training, some may hold qualifications in fields like surveying, while others might not have formal architectural credentials at all.
Architectural technologists, on the other hand, usually complete extensive training—often around six years—to become fully qualified and chartered. They're members of professional bodies such as the Chartered Institute of Architectural Technologists (CIAT) and are skilled in both creative design and the technical details needed for construction-ready drawings.
Involving a trained professional at this stage can be a real asset, ensuring your extension isn’t just creative and functional, but also compliant with all necessary regulations.

2. Planning Permission & Approvals
Some extensions fall under permitted development, but larger projects may require planning permission, which takes several weeks to secure.
It’s important to understand the boundaries of what you can build without full planning permission. In England, detached homes can typically be extended up to 8 metres from the rear wall, but this limit drops to 4 metres in Scotland and Wales. However, the extension—together with any previous additions—can’t cover more than half the original land around your house.
When it comes to height, your new extension can’t rise above the highest part of your existing roof. If the extension sits within two metres of your boundary line, its eaves (the part where the roof meets the walls) should stay under 3 metres high. And, as a general rule, you can’t build an extension forward of your main front wall or any area that faces a highway.
A few things don’t qualify for permitted development: you can’t include verandas, balconies, chimneys, TV aerials, or make changes to your current roof. Make sure to check these restrictions before you start, as bending the rules could mean you need to seek extra approvals.
National Guidelines for Permitted Development
Understanding what’s allowed under permitted development can save you a lot of time and paperwork. Here’s a quick overview of the main rules across England, Scotland, and Wales:
Rear Extensions: In England, you can extend a detached house out by up to 8 metres from the original rear wall; in Scotland and Wales, the limit is typically 4 metres.
Land Coverage: Any extension must not cover more than half the land surrounding your original house. This helps keep things in proportion and ensures outdoor space isn’t lost.
Height Restrictions: Extensions should not be taller than your home’s existing roofline. This keeps your project neighbour-friendly and visually consistent.
Boundary Rules: If your extension sits within two metres of the boundary, the eaves cannot be higher than 3 metres.
Front Extensions: You can’t extend forward of the house’s main front wall or out toward a road. The focus is on the side and rear of your home for a reason!
It’s also worth noting that features such as balconies, verandas, TV aerials, chimneys, or substantial roof alterations typically fall outside permitted development and will need separate approval.
With these basics in mind, you can start dreaming up your perfect space without running into planning headaches, but larger projects may require planning permission, which takes several weeks to secure. but larger projects may require planning permission,
What Isn’t Covered by Permitted Development?
It’s important to note that permitted development rights have their limits. Additions such as verandas, balconies, TV aerials, chimneys, and any alterations to your existing roof generally fall outside these rights. If you’re considering any of these features, you’ll likely need to submit a separate planning application. which takes several weeks to secure.
Understanding the Party Wall Act
If your home extension involves building up to, or on, a boundary shared with your neighbour—or working on an existing shared wall—the Party Wall Act comes into play. This piece of legislation is designed to help avoid disputes by making sure both you and your neighbours are informed and protected throughout the process.
The Act requires you to notify neighbours in advance about your plans and detail exactly how the work will proceed. In some cases, a party wall surveyor—an independent professional—may step in to help manage the process and ensure everyone’s property is safeguarded. Keeping communication open and following these guidelines will help your project run smoothly and keep relationships friendly.
Understanding Lawful Development Certificates
Not every addition falls under permitted development—features like verandas, balconies, or changes to your roof shape usually require separate approval. If your extension qualifies as permitted development and doesn’t need full planning permission, it’s still wise to consider applying for a Lawful Development Certificate (LDC).
An LDC is an official document from your local council confirming your extension complies with planning rules. While not compulsory, it offers peace of mind that your project is above board. This certificate can be especially valuable if you plan to sell your home in the future, as it provides buyers and their solicitors with clear evidence that your extension was built legally.
Party Wall Agreements & Neighbour Notifications
If your extension involves work on a shared wall or is close to your property boundary, you'll need to follow the procedures set out by the Party Wall Act. Start by giving your neighbours official written notice about the upcoming work—this should detail what you’re planning and when it will take place.
Once notified, your neighbours have a set period to respond. If everyone’s happy, you can move forward. However, if concerns arise or an agreement can't be reached, a party wall surveyor—an independent expert—may be brought in to ensure everyone’s property is protected and to resolve any disagreements. This process helps keep things clear and collaborative, significantly reducing the risk of disputes down the line.

3. Budgeting & Costs
Work with your builder to establish a budget that covers materials, labour, and unexpected expenses.
It’s important to be as clear as possible about your goals and requirements at this stage. A well-defined brief for your designer or architect will help you accurately determine what building work is involved—and, crucially, what it’s likely to cost. Be realistic about your budget and consider adjusting the size or scope of your extension to ensure it aligns with what you’re comfortable spending.
Remember, it’s rare for work to be limited to the new extension alone. Upgrades to your existing home—such as electrics, plumbing, or insulation—might be necessary, especially if your property is older. Bringing the whole house up to standard not only ensures a seamless finish but can also improve comfort and energy efficiency. Prioritise investing in the essentials and fabric of your current property first; any surplus funds can then be put towards the extension itself.
Allow a contingency within your budget to cover unforeseen costs, which can arise once work is underway. A little flexibility here can help prevent unwanted surprises and keep your project running smoothly.
Hidden Costs to Watch Out For
Home extensions often come with a few financial surprises, so it’s wise to be prepared for those unexpected extras that can creep into your budget. Some common hidden costs include:
Structural Surprises: Once work begins, issues like weak foundations, rotting timbers, or outdated wiring may be uncovered—all of which can require costly remedial work.
Hazardous Materials: Older properties sometimes hide asbestos or lead piping. Identifying and safely removing these can significantly increase costs.
Access and Site Challenges: Limited access for builders or machinery, or the need for specialized equipment, might add to your bill.
Planning and Survey Fees: Surveys for things like drainage, pest inspections, and building regulations approval can add up.
Contingency for Snags: Even with the best planning, unknowns can arise during the build, so it’s smart to set aside an extra 10-15% for unforeseen issues.
Having your builder thoroughly investigate your home before work starts, such as by digging trial pits or conducting specialist surveys, can help you spot—and plan for—these hidden costs early on. Planning ahead means fewer surprises and a smoother extension journey!
Minimising Delays and Managing Costs
Starting a home extension is a major investment, so it’s crucial to keep your project running smoothly—on time and within budget. Here are some practical steps you can take to reduce the risks of delays and unexpected expenses:
Get Detailed Plans Up Front
Provide potential contractors with identical and thorough architectural drawings or quantified schedules. This ensures all quotes are based on the same information, making comparisons simple and reducing the risk of costly surprises cropping up later.Choose Your Contractor Carefully
Research your builders before signing on the dotted line. Look for memberships with recognised organisations such as the Federation of Master Builders (FMB), and don’t be shy about asking to visit their previous projects or requesting references. Reliable builders should be open, communicative, and happy to showcase their work.Establish Clear Communication
Open, regular communication with your contractor is essential. Make sure both sides understand expectations, timelines, and budgets. If your builder is slow to respond or vague with information, this could be a red flag.Avoid DIY Project Management (Unless You’re an Expert)
Managing a building site is not for the faint-hearted. Unless you have experience, entrust your extension to a reputable main contractor who can coordinate all the different trades. Attempting to project manage yourself often leads to avoidable delays, higher costs, and unnecessary stress.Agree on Staged Payments
Protect your finances by agreeing to a payment schedule with your builder. Staged payments tied to project milestones keep everyone accountable, and you should never pay a large sum up front—ideally, your initial deposit should be no more than 10%.
Taking these proactive steps at the outset can help ensure your extension progresses with fewer hiccups, leaving you to look forward to your improved living space.
Typical Costs for UK House Extensions
One of the most common questions we’re asked is, “How much will my extension actually cost?” The answer depends on several factors, including the type of extension, quality of materials, and your location. Here’s a quick overview of what you might expect to budget for different types of home extensions in the UK:
Single-Storey Extensions
A straightforward, 25m² single-storey extension with standard fittings (think brick-and-block, PVCu windows, and standard patio doors) typically ranges from £2,000–£3,000 per m².
If you’re aiming for a more luxurious finish—perhaps aluminium doors or clay roof tiles—budget from £3,300 per m² and up.
Double-Storey Extensions
Opting for a two-storey extension can be surprisingly cost-effective for the space gained. Prices tend to range from £2,500–£3,000 per m² for a standard build, thanks to shared foundations and roofing.
Higher-end specifications usually push the cost above £3,500 per m².
Basement Extensions
If your property already has a basement with decent head height, a basic conversion may start around £1,500 per m².
Creating a new, fully waterproofed basement can be considerably more expensive, with costs often beginning at £3,500 per m² due to the complexity of underpinning and structural work.
Loft Conversions
For a simple loft conversion (such as adding rooflights to create a new room), expect prices from £2,300 per m².
Dormers (which provide extra space and light) start at around £2,500 per m².
More extensive projects—like hip-to-gable or mansard extensions—can push costs upward from £2,700 per m².
Other Home Extension Options
Side return extensions (popular for Victorian terraces, especially in London) are usually priced between £2,400–£2,800 per m² for the structural shell.
Factors That Affect Your Budget
Remember, these figures are estimates and can shift based on location (London and the South East tend to command higher rates), the complexity of your design, site access, and the finishes you choose. Always set aside a contingency fund for unexpected costs—extensions have a habit of revealing surprises once work begins!
Double-Storey Extension Costs
If you’re considering a double-storey extension, it’s good to know they offer more space for your investment compared to single-storey builds. On average, the typical cost per square metre for a standard double-storey extension ranges between £2,500 and £3,000. For those looking for higher-end finishes and a luxury specification, prices often start at £3,300 per square metre and up.
Factoring in both the scale and quality of your project from the outset can help keep your plans—and your budget—on track.
Typical Costs for a Single-Storey Extension
When budgeting, it’s helpful to have a ballpark figure in mind for your project. For a standard 25m² single-storey extension, you can generally expect costs to start from around £2,000 to £3,000 per square metre, depending on the finishes you choose. This usually includes basics like brick and block construction, PVCu windows, standard patio doors, and either felt or concrete roof tiles.
If you’re dreaming of higher-end touches—think aluminium-framed glazing, sliding or bifold doors, and premium roofing materials—prices typically rise to £3,300 per square metre or more. Your builder can guide you on where to invest for maximum impact, keeping your project both stylish and on budget.
Typical Costs for Other Popular Extension Types
When considering different types of home extensions, it’s helpful to know what you might expect to invest. For example, side return extensions—popular choices in urban areas like London—generally range from £2,400 to £2,800 per square metre for the shell of the structure. These extensions can often boost your property value by up to 20–30%.
Keep in mind that bespoke features, finishes, and site conditions can influence costs. It’s best to discuss your vision and budget with your builder upfront, so you know where you stand before the work begins.
Best Practice: Payment Terms and Contracts
When it comes to securing a builder for your extension, it’s crucial to set clear expectations from the outset—especially around payments and contracts. To protect your investment:
Always request a detailed contract. This should outline the scope of work, timelines, payment schedule, and what happens if there are delays or unexpected costs.
Avoid paying large sums upfront. A reasonable deposit is typically around 10% of the project cost.
Agree on staged payments tied to specific milestones—such as completion of the foundation, roofing, or plastering—so you only pay for work that has been completed to your satisfaction.
Ensure all changes or additions to the original plan are documented in writing.
Taking these steps will help your project run smoothly and give you peace of mind throughout the extension process.
Why Avoid DIY Project Management?
While it might be tempting to take the reins and manage your home extension yourself, especially to save on costs, it’s rarely a wise move unless you have solid experience under your belt. Juggling multiple trades, timelines, and unexpected issues can quickly become overwhelming.
Hiring a reputable main contractor means you benefit from their expertise in coordinating everything—from scheduling trades to handling regulations and troubleshooting on the fly. This not only reduces stress but also helps avoid costly mistakes and potential liability if things go sideways. In most cases, letting professionals steer the ship ensures a smoother build and greater peace of mind.
How to Compare Extension Quotes Effectively
Comparing quotes for your home extension project can feel overwhelming, but a little preparation goes a long way. Start by providing each contractor with the same detailed set of architectural drawings or quantity surveyor plans. This ensures that all quotes are based on identical information, so you can truly compare like-for-like.
When reviewing quotes, keep these tips in mind:
Make sure each quote includes a clear breakdown of materials, labour, and any additional costs.
Check that all your requirements are covered—variations in details can lead to big price differences later.
Resist the temptation to simply go for the lowest price. Focus on clarity and completeness, so you’re not caught off guard by unexpected costs as the build progresses.
If anything is unclear, don’t hesitate to ask for clarification.
Taking these steps will help you choose a contractor based on transparency and value, rather than just price.
Choosing the Right Builder or Contractor
Selecting a reliable builder is one of the most important steps in a successful home extension project. Taking the time to research thoroughly will pay off in the quality and smooth running of your build.
Here are our top tips for finding the right fit:
Do your homework: Start by searching potential builders on Companies House to check their financial health and ensure they’re in good standing. This helps avoid choosing a company at risk of going bust mid-project.
Ask around locally: Recommendations from neighbours or friends can be invaluable, especially if they’ve had similar work done nearby. Contractors familiar with your style of home and area are more likely to deliver accurate quotes and understand local quirks.
Look for relevant experience: Aim for builders with a solid track record on projects like yours. Don’t hesitate to ask for examples of previous work and, if possible, arrange site visits to see the quality firsthand.
Scrutinise credentials: Confirm your chosen builder is a member of a recognised trade body such as the Federation of Master Builders (FMB). This adds a layer of accountability and typically means they’ve been independently inspected.
Provide detailed plans: Supplying each potential contractor with the same set of architectural drawings or a quantity surveyor’s schedule helps create level playing field—so quotes are accurate and you can compare like with like.
Check communication: Reliable builders respond promptly and are clear with their information. Open communication from both sides helps prevent issues down the line.
Consider professional project management: Unless you have significant building experience, it’s generally best to appoint a main contractor to oversee your project. Attempting to manage trades yourself can introduce extra risk and stress.
Agree on payment terms: Avoid paying substantial sums in advance. Set up a staged payment schedule and try not to pay more than 10% deposit upfront.
Following these steps gives you the best chance of finding a trustworthy, skilled team—setting your extension up for success.
Choosing Your Build Route: How It Affects Extension Costs
When planning your home extension, another essential factor to consider is your chosen build route. The way you approach project management can significantly influence both your spending and stress levels. Here’s an overview of the most common options, and how each impacts your wallet:
Main Contractor (Most Popular Route)
Opting for a main contractor is the go-to for many homeowners. In this scenario, a single building firm organizes and oversees your entire project, offering the comfort of one point of contact. While straightforward, it tends to be the most costly approach since you’re paying for convenience and expertise.Builder + Subcontractors
If you’re looking to save (typically around 10%), you might choose to let a contractor handle the primary structural work—think walls and roof—until your extension is watertight. After that, you step in as the project manager, taking charge of coordinating trades like electricians and plumbers to finish the job.Self Project-Managed
Up for a challenge? By managing the whole scheme yourself (booking trades, scheduling deliveries, and keeping everything ticking along), you could save up to 20%. Just note: this doesn’t mean you’re physically swinging a hammer, but it does require time, organization, and nerves of steel.DIY Extension
If you’re hands-on and don’t mind a dusting of plaster, taking on much of the work yourself can lead to the biggest savings—sometimes up to 25%. Typically, you’ll hire professionals for the complex bits (like electrics and foundations), but handle finishing touches such as tiling, decorating, and landscaping on your own.
Each option has its pros and cons, and the right choice will depend on your experience, availability, and how much you fancy rolling up your sleeves. Careful budgeting at this stage ensures there are no nasty surprises down the line.
Why Consider a Structural Warranty?
Although not legally required, investing in a structural warranty is one of the best ways to protect your home extension throughout the building process and long after completion.
A structural warranty offers:
Long-term peace of mind: It shields you from unexpected costs if structural defects appear in the foundations, walls, or roofing after the extension is finished.
Financial reassurance: If you ever decide to remortgage or sell your home, most lenders and buyers will look for proof of this protection.
Independent checks: Warranty providers, such as NHBC or ICW, carry out site inspections during construction, ensuring everything is built to a high standard.
Safeguarding your investment: If any issues do arise, you’ll have extra support to help cover repairs—meaning no unpleasant surprises down the line.
Think of it as an extra layer of security for both your peace of mind and your bank balance, safeguarding your home improvement for years to come.
Insurance Costs for Home Extensions
Factoring in insurance is an essential part of your extension planning, and it’s wise to budget for this early on. The cost of extension insurance will depend on several things, such as the overall size and scope of your project, your property’s location (for instance, if you’re in a flood zone or mining area), and whether your home is listed or lies within a conservation area. Party wall agreements can also influence the price.
As a ballpark, a typical 12-month policy tends to range between £750 and £2,000. Smaller projects may only require six months of coverage, which usually costs less. For example, on a £200,000 home with a £100,000 extension, you could expect to pay about £480 for a six-month policy.
Including insurance in your overall project budget helps avoid unexpected surprises and ensures you have the right cover throughout the build.
Do You Need Specialist Home Extension Insurance?
Before work begins, it’s worth considering whether your current home insurance provides enough protection for your project. While it’s easy to assume your standard policy or your builder’s insurance will pick up the slack, in most cases, this isn’t quite true.
Standard home insurance is designed to cover a fully finished property. When building work gets underway—especially if parts of your home are left vacant, or if new structures are being added—your regular policy often won’t extend to cover the risks involved. Common exclusions can include theft of materials or equipment, accidental damage during building works, or issues arising from unoccupied spaces.
A specialist home extension insurance policy is designed to bridge these gaps. This type of cover typically protects not only your existing home, but also the new extension, materials on site, and tools or machinery used by your builders. It also ensures that you remain protected against things like structural damage or accidents that might otherwise fall through the cracks.
For peace of mind and to protect your investment as your project unfolds, it’s wise to talk to your insurer early. They can advise on any amendments required, or recommend a comprehensive extension-insurance policy that fits your needs.
Home Extension Insurance: What’s Typically Covered?
While you're busy planning budgets and blueprints, it's easy to overlook an often crucial detail—home extension insurance. Standard home insurance doesn't always cover building work, especially if your house will be unoccupied for part of the project. That's where a specialised extension policy steps in to give you peace of mind.
Here’s what you can usually expect from a home extension insurance policy:
Protection for Existing Structure and New Works
The policy generally covers your existing home as well as the new extension up to the full reinstatement value. This means any accidental damage during construction—think wayward scaffolding or burst pipes—won’t leave you footing the bill.Liability Cover
Employers’ and public liability insurance are typically included. This protects you if anyone working on site—professional or otherwise—gets injured, or if there’s accidental damage to neighbouring properties. It’s a safety net for both workers and visiting friends or family.Unoccupied Property Coverage
If you have to move out while builders work their magic, a tailored policy ensures your property stays protected, even when you're not living there. Standard policies often leave a gap here.Legal Expenses and Support
Should any disputes arise over contracts or responsibility, many policies offer legal expense cover and provide advice, helping you resolve issues without draining your renovation fund.
Taking care of insurance early means fewer unwelcome surprises, letting you focus on the transformation at hand.
4. Construction Phase
Once groundwork is completed, structural work, roofing, and interior installations take place. This stage can take several weeks to months, depending on project size.
The timeline varies: loft extensions and conversions often take around 16 weeks, while larger ground-floor extensions may require six to seven months. More complex, whole-house refurbishments with an extension can take up to a year. Keep in mind that living in your home during construction—except for loft works above the ceiling—can slow down the process. Delays in making decisions or choosing fixtures and fittings can also extend the schedule. Clear communication and timely choices will help keep your project on track.
Living On-Site: Impact on Timeline
Choosing to stay in your home during construction can often extend the overall timeline. Shared spaces and daily routines may slow progress, as builders need to work around your presence and maintain safe, accessible routes.
Exceptions include loft conversions or extensions built entirely above your existing ceilings—these tend to have less disruption, allowing the schedule to stay closer to plan. In most other cases, however, expect a bit of extra time added to account for the added coordination required.
Structural Warranties: Peace of Mind for Your Extension
While not legally required, a structural warranty can be a smart move when planning a home extension—especially for larger or more complex builds.
A structural warranty is essentially an insurance policy that protects you against major defects in the structure, such as issues with foundations, walls, or the roof, for several years after completion. It offers reassurance that if something significant goes wrong due to faulty materials or workmanship, you won't be left dealing with hefty repair bills on your own.
Some key benefits of a structural warranty include:
Long-Term Security: Coverage typically lasts 10 years, giving you and future buyers confidence in your investment.
Easier Financing and Sale: Many lenders require a structural warranty before they’ll approve a mortgage or loan on the property, and it can also make your home more attractive if you plan to sell.
Quality Assurance: Most warranty providers inspect the work at critical stages, ensuring it meets their standards before cover is granted.
While it's an added cost, for many homeowners, the peace of mind and future flexibility make a structural warranty well worth considering for their extension project.
Contract Administration & Onsite Support
While your extension is being built, you’ll have a few options for ongoing support. Many design professionals, like architects or interior designers, have established relationships with reputable contractors. They can help introduce you to builders who've worked on similar projects, negotiating to make sure you find the right fit for your needs and budget—no open bidding wars required.
You might also choose to have your designer manage contract administration throughout the build. This means they’ll oversee the work on your behalf, making sure everything stays on track and up to standard. Alternatively, if you prefer a lighter touch, you can ask your designer for advice as and when issues arise, or have them carry out a final inspection to catch any last-minute snags before you move back in. This ensures your extension is delivered just as planned and built to a quality you can trust.
Building Regulations & Inspections
Even if your extension doesn’t require planning permission, it still needs to meet Building Regulations. These rules ensure your project is safe, energy-efficient, and built to code.
There are two ways to get approval:
Full Plans Submission: Ideal for larger or higher-value projects. You submit detailed architectural drawings to your local council, and they review these plans before work begins.
Building Notice: Best for smaller or straightforward extensions. You simply notify the council of your intention to start, without needing comprehensive plans upfront.
Throughout the build, local authority inspectors will visit at key stages—such as foundations, structure, and final completion—to check that all work meets regulations before you move forward.
Potential Pitfalls of Large Rooflights
The idea of one expansive rooflight can certainly be appealing, lending drama and flooding your new space with daylight. However, it’s wise to proceed with caution. Extra-large rooflights can sometimes let in more sunlight than you bargained for, making rooms uncomfortably bright or even causing glare during certain times of day.
There’s also the issue of insulation. Large panes of glass typically don’t insulate as well as a well-built roof. Swapping out substantial roofing for glazing can make it harder to maintain a comfortable indoor temperature and may lower your space’s overall thermal efficiency.
To strike the right balance, consider using several smaller rooflights or specifying high-performance glazing—this way, you still enjoy the light without compromising on energy efficiency or comfort.

5. Finishing Touches & Completion
After construction, interior decorating and snagging checks ensure everything is finished to a high standard before moving back in.
Common Mistakes to Avoid During Your House Extension
While extending your home is exciting, it’s easy to stumble into pitfalls along the way. Here are some frequent mistakes homeowners make—and how to sidestep them for a smoother project:
Vague or Incomplete Plans
Don’t settle for rough sketches or mismatched information when seeking quotes. Always provide each contractor with the same set of detailed architectural plans or quantity surveyor documentation. This ensures you’re comparing apples to apples and helps prevent cost surprises down the road.Skipping Background Checks
Take time to thoroughly research your contractors. Look for reputable firms—preferably members of organizations such as the Federation of Master Builders (FMB)—and don’t hesitate to request references or visit their previous projects. Quality workmanship matters, so seeing finished results can give you extra confidence.Poor Communication
A good contractor stays in touch and answers questions promptly. If you notice delays or reluctance to share information, it can be a red flag. Equally, maintain clear and open communication from your side—projects run smoother when everyone is on the same page.DIY Project Management Without Experience
Tempted to juggle tradespeople yourself to save a few pounds? Unless you have significant experience in managing construction projects, this often leads to stress, costly errors, and additional liability. Rely on a reputable main contractor to coordinate the build for you.Paying Too Much Upfront
Protect your investment by setting up a contract that outlines staged payments tied to visible milestones. Avoid large upfront deposits—typically, a deposit of 10% is sufficient to secure your builder and keep everyone accountable.
By avoiding these common mistakes, you set your home extension up for success—from the initial design meeting to the final brushstroke.
Ready to start your home extension? Contact Creating Spaces for expert guidance and quality workmanship.